
In summary:
- Professional skyline photography is about deliberate planning—mastering light, weather, and season—not just finding the right location.
- Embrace technical pre-visualization using tools like weather webcams and sun-tracking apps to predict the perfect shooting conditions.
- Move beyond wide-angle shots by using telephoto lenses to create compression and abstract compositions.
- Master your camera’s manual settings to control the extreme dynamic range of night scenes and capture the true colours of the CN Tower’s light shows.
Every visitor to Toronto comes home with a photo of the CN Tower. It’s an icon, a postcard, a visual shorthand for the city itself. But for amateur photographers and content creators, this ubiquity presents a challenge: how do you capture a subject that has been photographed millions of times and still create something that feels original and personal? The internet is filled with lists of the “best spots”—Polson Pier, the Toronto Islands, Riverdale Park—but these are just starting points. They tell you where to stand, but not how to see.
The standard advice to “shoot at golden hour” or “use a tripod” is true, but it’s table stakes. It doesn’t account for the unique atmospheric dynamics created by Lake Ontario, the intricate dance of the tower’s nightly light shows, or the compositional possibilities hidden in plain sight. Capturing the city’s true identity requires moving beyond the tourist cliché. But what if the key wasn’t finding a secret, unknown vantage point, but rather applying a professional’s mindset to the most well-known ones?
This guide is built on that very principle. We will deconstruct the process of creating professional-level skyline photography. We won’t just list locations; we will explore the technical pre-visualization, compositional intent, and artistic choices that transform a simple snapshot into a compelling image. We will delve into how to read the weather like a pro, master challenging night-time exposures, and plan your shots with the precision of an artist, not a tourist.
text
This article provides a structured approach for photographers looking to elevate their work. The following sections break down key concepts, from understanding the value of different perspectives to mastering the technical settings required for stunning results.
Table of Contents: A Pro’s Workflow for the Toronto Skyline
- Why Does the EdgeWalk Cost $200+ for 30 Minutes?
- How to Frame the Skyline from Polson Pier for the Perfect Shot?
- CN Tower vs. The One (Future): Which Will Have the Better View?
- The Weather Forecast Mistake That Wastes Your CN Tower Ticket
- When Does the Tower Do Its Special Light Shows?
- When to Catch the Best Skyline Sunset from the Islands?
- How to Set Your Camera for Night Skyline Shots?
- How to Plan a Romantic Date Around Toronto’s Best Views?
Why Does the EdgeWalk Cost $200+ for 30 Minutes?
At first glance, the price tag for the CN Tower EdgeWalk seems steep. You’re paying a premium for a 30-minute experience. However, from a photographer’s perspective, the cost isn’t just for an adrenaline rush; it’s for access to a perspective that is utterly unique and impossible to replicate. You are hands-free on an open-air platform 116 storeys (356m/1168ft) above the ground, with no glass between your lens (held by a guide) and the city below. This isn’t just a high-up view; it’s a completely unobstructed aerial vantage point that even helicopter tours struggle to match in terms of stability and intimacy.
While personal cameras are not permitted for safety reasons, the included professional photos offer a clarity that shooting through the SkyPod’s thick, often smudged, glass cannot. When evaluating the cost, a professional thinks in terms of value and exclusivity. Is the goal a quick snapshot, or is it to capture a perspective few others can? For a content creator, an EdgeWalk shot is immediately differentiated from the thousands of pictures taken from the observation deck. It tells a different story—one of height, exposure, and a direct connection to the city’s architecture.
To put this in context, consider the alternatives for capturing an aerial-style shot of Toronto. Each option presents a different trade-off between cost, creative control, and final image quality.
| Photography Option | Approximate Cost (CAD) | Key Photographic Limitation |
|---|---|---|
| EdgeWalk | $195 – $225 | No personal cameras allowed; shots taken by guide. |
| Helicopter Tour | $300 – $500 | Very short duration (7-15 mins); vibration and movement. |
| CN Tower SkyPod | $15 – $20 (add-on) | Shooting through thick, reflective glass. |
| Free Ground Locations | $0 | Requires significant skill, timing, and gear to overcome distance. |
Ultimately, the $200+ cost is for a guaranteed, unique photographic product. While it sacrifices creative control, it delivers a perspective that would otherwise require thousands of dollars in specialized equipment or charter fees. For a photographer, it’s a calculated investment in a specific, high-impact asset.
How to Frame the Skyline from Polson Pier for the Perfect Shot?
Polson Pier is arguably the most famous viewpoint for the Toronto skyline, and for good reason. It offers a classic, waterfront composition that is balanced and iconic. However, most amateur shots from here look identical. The key to elevating your image is moving beyond simply showing up and pointing your camera. A professional approach involves two key concepts: technical pre-visualization and compositional intent through lens choice.
Instead of guessing, pros use tools like The Photographer’s Ephemeris (TPE) to plan their shots with precision. As photographer Steven Vandervelde notes, this app allows you to see exactly where the sun will set in relation to the skyline on any given day of the year. This means you can plan months in advance to be there when the sun aligns perfectly behind the downtown core, creating a dramatic “Toronto-henge” effect. This is the difference between hoping for good light and engineering it.
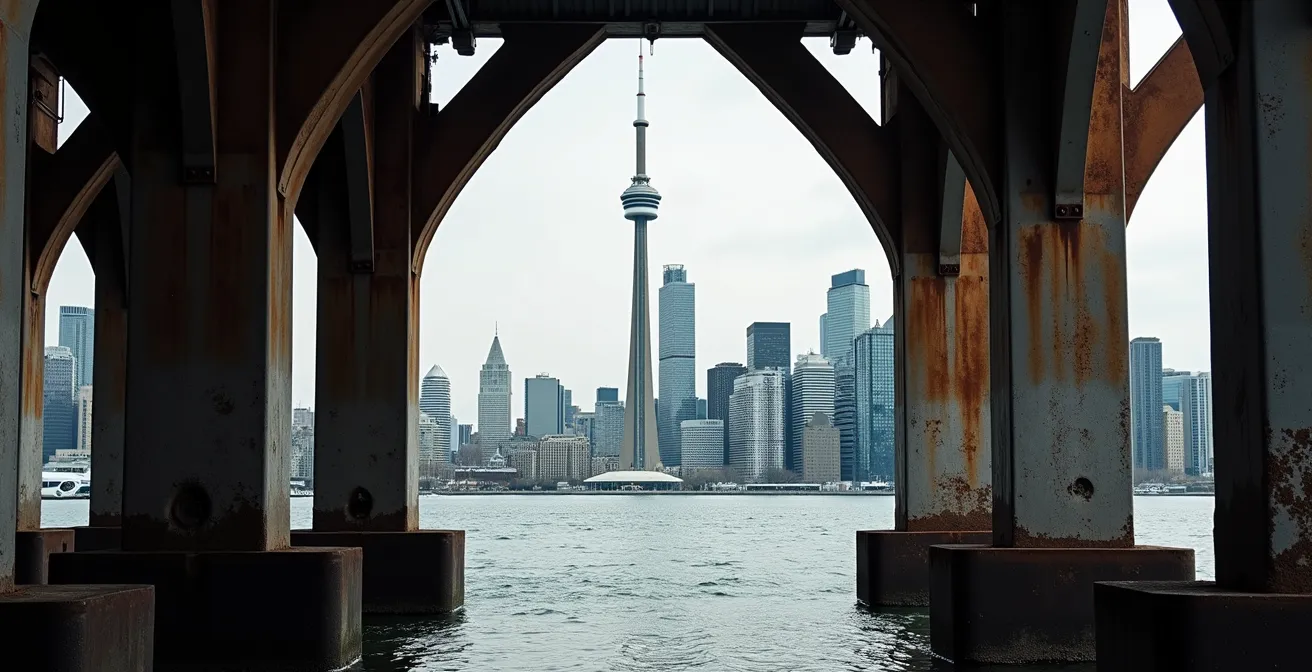
The second professional technique is using a telephoto lens (e.g., 70-200mm or longer) to create telephoto compression. A wide-angle lens makes distant objects feel even farther away, but a telephoto lens stacks them together, making the skyline feel denser, more massive, and more imposing. As seen in the image above, this technique transforms the view, turning the layers of buildings into a powerful, abstract pattern. By framing the compressed skyline with the industrial elements of the pier in the foreground, you create a narrative contrast between the weathered foreground and the sleek, modern city—a story that a simple wide shot cannot tell.
CN Tower vs. The One (Future): Which Will Have the Better View?
The Toronto skyline is not static. With the rise of “The One” at Yonge and Bloor, set to become Canada’s tallest skyscraper, photographers must consider a new future for skyline views. The question isn’t just about height, but about the nature of the perspective itself. The CN Tower and The One will offer fundamentally different photographic experiences, each with its own artistic merit.
The CN Tower’s strength has always been its isolation. Standing apart from the main financial district cluster, it provides a clean, unobstructed 360-degree panoramic view. From a photographic standpoint, this is ideal for wide, expansive cityscapes and for tracking weather systems moving across the region. You are an observer looking *at* the city from a distance. Its height allows you to shoot down, simplifying backgrounds and isolating subjects like the Rogers Centre or the geometric patterns of city streets.
The One, in contrast, will offer a perspective from *within* the heart of the urban canyon. Its observation deck will place you at eye-level with the tops of other supertall skyscrapers. The photographic opportunity here is not the panoramic sweep, but the intimate, layered, and dense compositions. You’ll be able to capture the texture of neighbouring buildings, the interplay of light and shadow between towers, and a feeling of being completely immersed in the architecture. It will be a view *of* the skyline, *from* the skyline. For photographers, this means a chance to create more abstract, architectural-focused images that emphasize a sense of scale and density, a perspective Toronto has never offered before.
The “better” view, therefore, depends entirely on compositional intent. For the grand, all-encompassing landscape of the city and its relationship to the lake, the CN Tower will likely remain supreme. For a dramatic, Blade Runner-esque immersion into the dense fabric of the downtown core, The One will provide an exciting and entirely new creative canvas.
The Weather Forecast Mistake That Wastes Your CN Tower Ticket
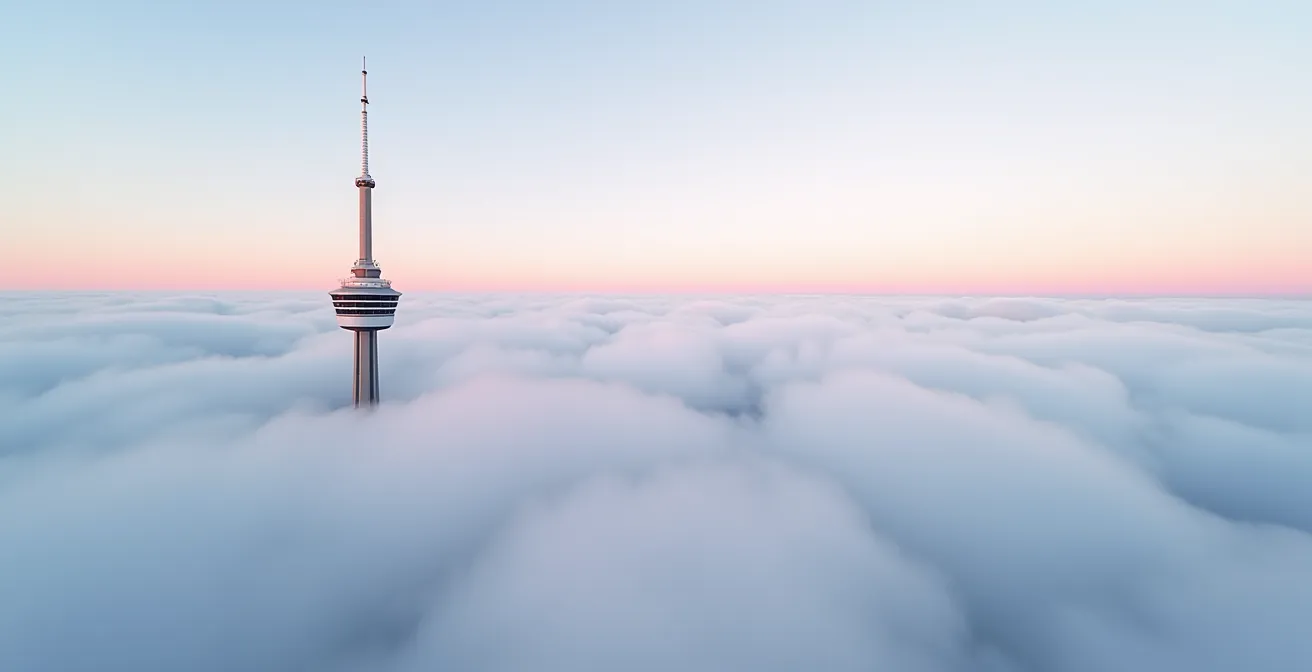
One of the most common and costly mistakes photographers make is checking the ground-level weather forecast for Toronto and assuming it applies to the top of the CN Tower. A clear, sunny day at street level can mean you’re standing inside a thick cloud at 346 metres, with zero visibility and a wasted ticket. A professional photographer treats atmospheric dynamics as a key creative element and knows how to predict conditions at altitude, not just on the ground.
The key is to look at tower-specific data. The most crucial mistake is ignoring the cloud ceiling height. The observation deck is high enough to be completely enveloped in clouds even when the city below is clear. Conversely, the most magical photographic opportunities, like a “sea of clouds,” occur during temperature inversions. This is when a layer of warm air traps cooler, foggy air below it. The city disappears under a blanket of white, with only the top of the tower and a few other skyscrapers piercing through into the clear sky above. This phenomenon is often predictable by looking for fog warnings combined with reports of a clear upper atmosphere.
Furthermore, Lake Ontario has a massive impact on visibility. In summer, humidity and haze can reduce clarity significantly, limiting views to 20-30 km. In contrast, crisp, cold winter air can offer stunningly clear views exceeding 100 km. Don’t just check for “sun” or “clouds”—look for visibility metrics. A professional workflow involves a protocol that goes far beyond a standard weather app.
Pro Weather Check Protocol for CN Tower Photography
- Pre-purchase check: Before buying a ticket, review the CN Tower’s live webcams on sites like Earthcam to see the real-time view from the top, not the ground.
- Monitor ceiling height: Use an aviation weather app to check the cloud ceiling; the observation deck is at approximately 1,136 feet (346m).
- Look for inversions: Watch for morning fog warnings paired with forecasts for clear skies at higher altitudes. This is the recipe for a potential “cloud sea.”
- Track lake effect: Prioritize shooting days with low humidity and offshore winds for maximum clarity, especially in winter.
- Time storms strategically: The 30-60 minutes before a storm arrives often bring the most dramatic cloud formations and light, creating a powerful backdrop for your shots.
When Does the Tower Do Its Special Light Shows?
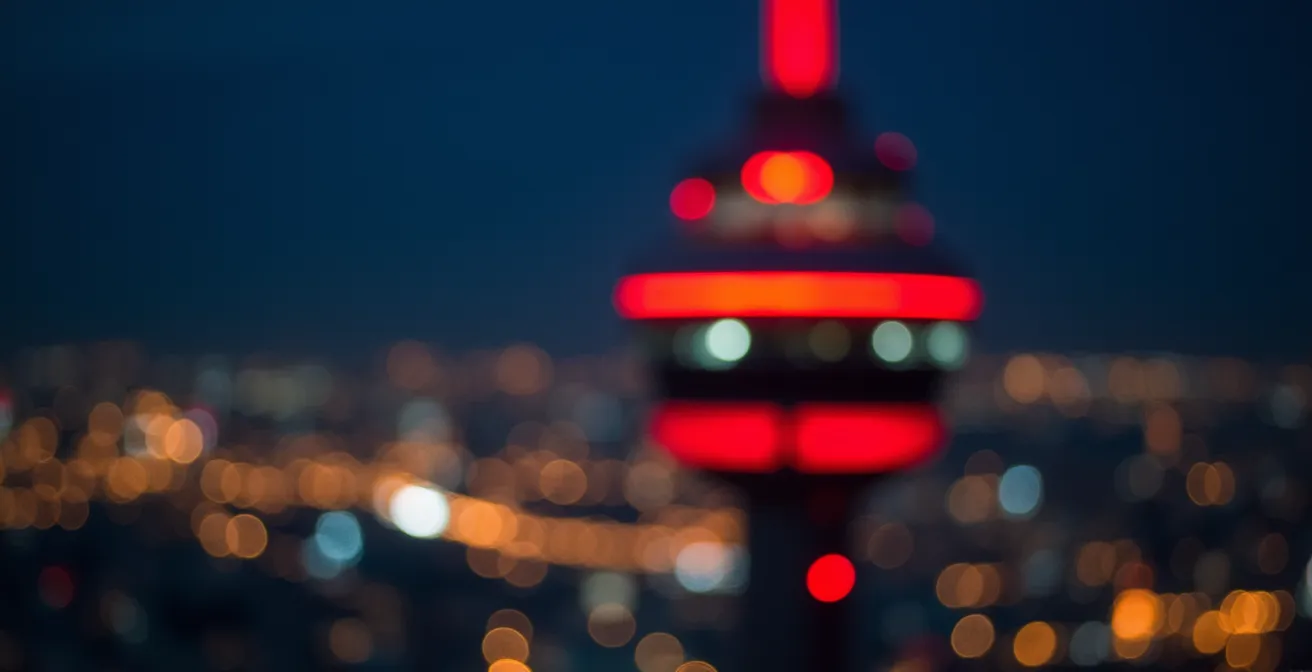
The CN Tower’s nightly illumination is more than just a static beacon; it’s a dynamic canvas that tells stories about the city’s culture and events. As a photographer, understanding and anticipating these light shows transforms the tower from a simple subject into a time-sensitive creative opportunity. The tower’s advanced LED system, capable of 16.7 million colours, is programmed for specific occasions, providing unique colour palettes to work with.
The lighting isn’t random. It follows a schedule tied to national holidays, charitable awareness campaigns, and local celebrations. For example, the tower will glow blue and white for a Maple Leafs home game, purple for the Raptors, a vibrant rainbow during Pride Month, or a solemn orange for the National Day for Truth and Reconciliation. Knowing this calendar allows you to plan shots that have a deeper narrative context. A photo of a red and white tower on Canada Day carries a different meaning than a standard white illumination.
Photographing these light shows, however, presents a technical challenge. The constantly changing colours can fool a camera’s auto white balance, resulting in unnatural colour shifts in your final image. A pro takes manual control. Setting a fixed manual white balance (around 5200K is a good starting point) ensures colours are rendered consistently as they change. Furthermore, using a long exposure of 30 seconds or more allows you to capture the full cycle of a colour transition in a single frame, creating beautiful, soft gradients of light. For even more advanced effects, a 3-stop Neutral Density (ND) filter can allow for multi-minute exposures during blue hour, blurring clouds into dramatic streaks while the tower’s lights paint a vibrant path across the sensor. Always shoot in RAW format to retain maximum data for colour correction in post-production.
The standard top-of-the-hour light show is a short, dynamic display that’s perfect for time-lapses. Setting your camera to take one shot every 30 seconds for an hour before and after sunset can yield a spectacular sequence showing the sky’s transition from day to night as the city and the tower come to life with light.
When to Catch the Best Skyline Sunset from the Islands?
The Toronto Islands offer a serene and beautiful vantage point for skyline photography, but capturing a truly spectacular sunset requires more than just hopping on a ferry. A professional shot from here is a synthesis of timing, positioning, and an understanding of seasonal light. Two key factors must be planned: the sun’s position and the ferry schedule.
Firstly, the sun’s path across the sky changes dramatically with the seasons. During the summer solstice, the sun sets far to the northwest, well clear of the downtown core. In the winter, it sets in the southwest. The ideal time for that perfect shot of the sun dipping behind the skyscrapers is during the spring and autumn equinoxes. This is when the sun sets almost directly west, aligning perfectly behind the financial district. Using an app like TPE is non-negotiable here; it allows you to pinpoint the exact date and time the sun will align with your desired composition from a specific spot, like the beach east of the Ward Island Ferry Terminal.
Secondly, you are on the clock. You must plan your shoot around the ferry schedule. Knowing that the last ferry departs around 11:30 pm in summer but as early as 9:45 pm in winter is critical. The best light often occurs during the “blue hour,” the 30-60 minutes *after* the sun has set. This is when the sky holds a deep, rich blue and the city lights begin to balance perfectly with the ambient light. Missing the last ferry means an expensive water taxi ride, so building your shoot timeline backwards from the final departure time is a crucial part of the professional workflow.
The ideal plan involves arriving at least an hour before sunset to scout your exact spot. Set up your tripod and lock in your composition. Shoot through the golden hour, the sunset itself, and well into the blue hour. This ensures you capture the full range of light, from the warm, golden glow on the buildings to the sparkling jewel-box effect of the city at night. This methodical approach is what separates a lucky snapshot from a deliberately crafted photograph.
How to Set Your Camera for Night Skyline Shots?
Photographing the Toronto skyline at night is one of the most rewarding but technically demanding challenges. The extreme contrast between the deep black of the night sky and the brilliant, pinpoint lights of the buildings—the dynamic range—can easily overwhelm a camera’s sensor, leading to blown-out highlights or noisy, crushed shadows. Professionals use specific techniques to manage this dynamic range and ensure every detail is captured with stunning clarity.
One advanced method, used by photographers like Robert Burcher, involves extremely long exposures from a great distance. Shooting from 4km away with a powerful telephoto lens, he uses a mode like “Live Composite,” which takes a base exposure and then only adds new light to the frame. This allows for 10-20 minute exposures where car light trails streak across the frame and building lights burn in brightly without overexposing the entire scene. It’s a technique that requires immense patience and a very sturdy tripod.
For those without specialized camera modes, the most reliable professional technique is exposure bracketing for HDR (High Dynamic Range). This isn’t about pushing a single “HDR” button on your camera, which often creates an unnatural, over-processed look. It’s a manual, deliberate process for capturing the full range of light in the scene. The goal is to blend multiple exposures together in post-production for a final image that looks natural, detailed, and true to what the eye sees.
Professional HDR Bracketing Method for Night Skylines
- Set up for sharpness: Mount your camera on a sturdy tripod. Set it to Manual mode, with a low ISO (100-400) and a sharp aperture (f/8-f/11).
- Enable bracketing: In your camera’s menu, enable Auto Exposure Bracketing (AEB). Set it to take 5 shots at 1-stop intervals (e.g., -2, -1, 0, +1, +2).
- Focus manually: Switch your lens to manual focus. Use your camera’s live view and zoom in 10x on a distant, bright point of light, like the CN Tower’s antenna.
- Nail the focus: Carefully turn the focus ring until that point of light is as small and sharp as possible. This is far more accurate than autofocusing on a dark building.
- Trigger without shake: Use a 2-second timer or a remote cable release to take the bracketed sequence. This prevents any camera shake from pressing the shutter button.
- Merge in post: In software like Adobe Lightroom or Photoshop, merge the five exposures. Use luminosity masks for the most natural-looking blend, retaining details in both the brightest highlights and darkest shadows.
Key takeaways
- Great skyline photography is an act of deliberate creation, not passive observation. Success lies in your planning.
- Treat Toronto’s unique atmospheric conditions—lake haze, cloud inversions, storm fronts—as powerful compositional elements to be harnessed, not obstacles to be avoided.
- Mastering your equipment is crucial. Move beyond automatic settings to use telephoto compression, manual exposure bracketing, and long exposure techniques to realize your artistic vision.
How to Plan a Romantic Date Around Toronto’s Best Views?
A photography-focused date can be an incredibly romantic and creative way to experience the city, blending a shared activity with the beauty of Toronto’s best views. The key is to plan an itinerary that feels like a special evening out, not a grueling photo assignment. This means choosing locations that are both photogenic and offer a great atmosphere, and being mindful of etiquette.
A wonderful option is a multi-location route like the one offered by Humber Bay Park. You can start with a golden-hour stroll or bike ride along the waterfront, culminating at the iconic Humber Bay Arch Bridge. This spot provides breathtaking views of the skyline across the water, perfect for sunset. The park atmosphere is relaxed and beautiful, making it a perfect backdrop for a romantic outing. As night falls, the view transforms, offering a classic night or sunrise shooting location favoured by local pros.
For a more upscale experience, consider a rooftop bar like Harriet’s Rooftop or The Broadview Hotel. These venues offer stunning, elevated perspectives of the city. However, this is where photography etiquette becomes paramount. You are a patron first and a photographer second. A large, obtrusive camera setup can disrupt the ambiance and is often against house policy. The goal is to be discreet and respectful. Call ahead to check their camera policy. Opt for a smaller, high-quality mirrorless camera with a compact prime lens instead of a large DSLR with a zoom. Keep your gear in a stylish bag, not a bulky camera backpack. Order drinks or food and enjoy the venue before discreetly taking a few photos. Limit your shooting to just a few minutes, never use a flash, and absolutely do not set up a tripod. This approach shows respect for the establishment and other patrons, ensuring you are welcomed back.
By blending stunning locations with thoughtful planning and respectful execution, you can create a memorable date that results in both beautiful shared experiences and stunning photographs. The best shot is often the one that captures a genuine moment of connection, with the city as your magnificent backdrop.
Now that you have the professional’s mindset and toolkit, the next step is to get out there and start shooting. Pick a location, check the conditions, and begin telling your own visual story of Toronto.